Monday, November 14, 2016

Studio Organization

I wish I had done this a long time ago.

My studio has always been a bit of a mess. Recently we moved into a new home, and my studio, of course, moved with me. The new home is just a little bit, well, classier than the old one, so I've decided I'd like to be a little less of a Pig Pen when it comes to my workspace, too. Not only that, but I've been very frustrated lately when I had to dig through drawers of paints that were jumbled together in no particular order, trying to find that one tube of yellow ochre that I am certain that I have somewhere.

Goals for my organizer:
 1. Create a place where I can keep my paints in such a way that I can instantly see what I have and reach for the right tube without having to dig through a bunch of crap.
2. Don't spend a lot of money.
3. Make it mobile. I want to be able to move it anywhere in the room, because sometimes the location of my easel changes. Like last month, when Hurricane Matthew hit and we had water damage in a corner of the studio and I had to move the easel across the room so ServPro could set up their monstrous and obnoxiously loud fans to dry out the walls. But I digress...

So here is what I did.

The base piece:

Slim Slide-Out 5-Tier Storage Tower - Ideal in Your Kitchen, Bath and Laundry Rooms! ($49.00)

I placed it on three wheeled casters that I got from Home Depot. The unit comes with wheels, but they don't swivel. I want to be able to move this in any direction and easily spin it around, since I'm hanging oils on one side and acrylics on the other.
http://www.homedepot.com/p/Shepherd-6-in-Steel-Tri-Dolly-with-200-lb-Load-Rating-9299/100193474 ($12.00)

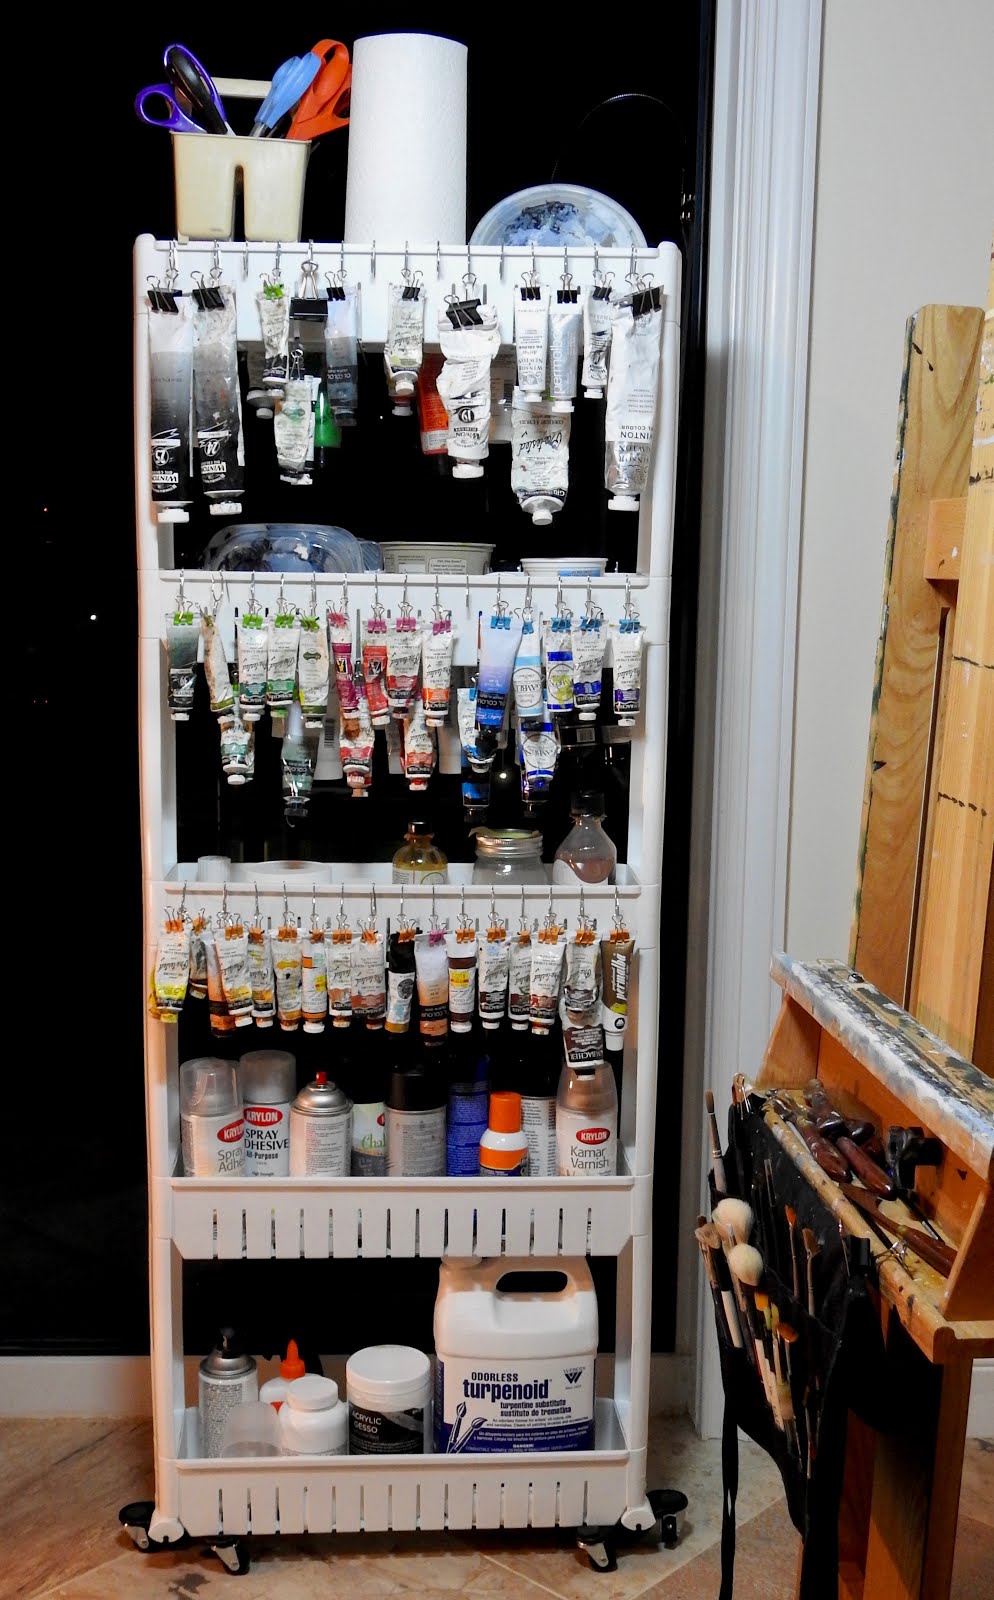
Then I drilled tiny holes across the upper lip of the shelves so I could insert drapery hooks, which I already had on hand. I did have to buy a few more to complete the project, and found them a little difficult to find locally, since it would appear that very few people actually hang drapes with them anymore. HomeGoods and Target were a no, but Ace Hardware had them. ($5.00)

The next step was to attach a binder clip to the end of each of my paint tubes and hang them from the drapery hooks. ($12.00)


And there you have it. A mobile paint supply station that hides in the corner when not in use. Total price: $78.00


Friday, November 4, 2011

Last Steps and the Finished Product

Trivia question of the day:  How many spokes are there on a unicycle wheel?  Answer:  Thirty-six.  Thirty six very straight and surprisingly unpatterned torturous black spokes.  To get them just right, I chose not to freehand them.  I placed a piece of tracing paper over the painting and outlined the wheel and pedals, took that back to my desk and drew in the spokes with the aid of a ruler.  Then I placed it back over the painting with a piece of transfer paper in between and traced over the spokes to transfer the drawn lines onto the painting.  I still had to actually paint all those straight lines in, which I did with the aid of a beer and a lot of breath holding.  

I then went back over everything one last time.  I added another layer of paint to the background to enhance the colors and actually decrease the amount of brush stroke detail.  I added a touch more color to the skin tones.  And I reworked the hairline a little to try to reduce the look of premature male-pattern baldness that my daughter pointed out (thank you, Jamie).


And that's it.  The only thing left to add is the signature :-)

Thanks for joining me!

Tuesday, November 1, 2011

The Part I Can't Explain

This is where The Zone comes in.  The Zone is the mysterious mental place that an artist enters into, where time and external distractions just seem to fade away.  If you watched the show "Heroes," it's where Isaac Mendez went when he painted the future.  It's very hard to explain what I do at this point, except that I just start mixing, blending and adding color.  I paint an entire layer (or more) over the area I want to add color and detail to, and I just keep working it until I get it right.  

Books on painting will always talk about "organizing your palette" and carefully arranging the colors.  That doesn't work with Zone painting.  Mine looks something more like this:


Here's what it looks like with all of the flesh tones worked at least once.  The clothing and some of the unicycle have also received a coating of color.
I had originally thought I would leave the lower background as it was, but decided it needed more work. Here you see the main color layer for the entire painting.  What's left?  Not much.  After this dries, I'll add in the unicycle spokes and go back over the entire thing to accent highlights, augment color and work on any detail that needs perfecting.  Next post:  The Finished Painting.

Wednesday, October 26, 2011

From clouds to the beginnings of skin tones


For the clouds, I start with big brush strokes then smooth them with a blending brush.  Then I layer more paint on top to create depth.  I use white with a touch of greyed down blue to create shadows in the clouds.

My pattern is to work on the objects that are in the background first, and work my way to the foreground.  Since the clothing is over the skin and the unicycle is in front of the clothes, I'll work in that direction (though not shown here, I've already painted the chair that he is sitting in).  This is the first layer of skin tone color - still pretty monochromatic, but beginning to look more like flesh than a pumpkin.  At this point, I think it looks particularly ghoulish, which is pretty appropriate for this Halloween season. We'll call this stage "Zombie Alex."   Note the finished clouds in the background.

Thursday, October 6, 2011

Finally, some color!


This is the first layer of color in the background.  Most of the colors are transparent, and the mountains will certainly need at least one additional layer of paint before they can be considered done.  I will also add clouds later.  I went ahead and painted the yo-yo, since I already had the colors on my palette for the grasses, but it, too, will need some additional paint touches once this layer is dry.  I wanted to paint more, but can't do more on the background until this layer dries.   To start working on the figure would be risking sticking my hand in the wet surrounding area, and since I've already done that twice today, I decided it would be wise to call it quits.  Guess I have no excuse not to get on the treadmill.

Wednesday, October 5, 2011

The Completed Underpainting

I blocked in a background with some significance for my son (the subject).  This is a view of  Philmont Scout Ranch in New Mexico, where, this summer, he hiked about 80 miles.  It was clearly one of the best experiences he has had in his young life and very important to him now, so I thought it only fitting to include it in his portrat.

The next step will (finally!) be the beginnings of color.


Friday, September 23, 2011

The Underpainting in Progress

This is a step I used to skip. I couldn't understand why you would want to paint the entire thing only to paint on top of it and hide what you just did.  It turns out, however, that even though I will paint several layers of paint on top of this one, it is never really hidden.  The layers on top meld with this one and create a depth to the painting that can't be achieved with a single layer of paint.  I also find that, if I do it right, this is the most difficult step and the other layers are easy once I have the basic lights and darks down.

I've used a mixture of burnt umber and ivory black as my base color, then added galkyd medium.  I thin this with odorless mineral spirits as needed to get the variations in the shadows.  The highlights are zinc white.  I add no other colors in this step - the object is simply to map out the value (relative degrees of lightness and darkness) of the painting.  Note that I use a black and white photo to help me identify them.


Color comes later.  After I finish this step (the shirt, face and left arm are still not done).  Which may be a while, given that I am headed out for a vacation in Mexico.  Mas adalante.  Hasta la vista, baby!

Wednesday, August 31, 2011

Blocking in the Background

After a several week break for a cruise with the family, a bunch of days (and nights) at the regular job, a painting for charity and a painting for a baby nursery (congrats, Melissa, I expect that the baby has arrived by now), I'm finally back to this one.  If I get started on a project and don't have many intervening obligations, they go quickly, but once I get distracted it's often diffucult to get back into the swing.  I have another portrait that I've been itching to do and I almost started it today instead of getting back to this one.  I had to give myself a little mental push to keep my focus.  I have sometimes had more than one painting going at a time, and I suppose if I didn't have the forced breaks to go to work, I would do it more, if for no other reason than to have something to do while I waited for a layer of paint to dry.

Which brings us to where we are today.  I have blocked in the background with a thin layer of paint.  This layer is intended to get the basic lights and darks without specific color or detail.  After this dries completely, I'll add another layer to start deepening the tones and begin to add more color.  I don't have time today to do the same with the foreground figure, but will get to that in the next session or two.

As I was painting the white upper background, I got the idea to use a mountain scene from the summer trip my son took to Philmont Scout Ranch in Arizona this summer.  So, before I paint again, I'll be looking for a photo to incorporate into the background.  I love the way these things evolve!

Thursday, August 4, 2011

Art & WineFest

Gearing up this afternoon for the Art & WineFest at the Hyatt Regency Riverfront.  I've got all my stuff loaded in and set up and am just tying up a few loose ends to be ready for the event tonight from 6-9.  This event should be a lot of fun.  Much less work than the weekend-long shows I've don't before, I'm taking only a selected collection of pieces and in addition to art, there will be wine!

Anyone wondering about the painting, stay tuned.  I've just been too busy to get back to that particular one lately.  Since my last post, I have painted a piece specifically for donation to the silent auction at the Art  WineFest (to benefit Wolfson's Children's Hospital), and a set of paintings for a newborn nursery.  And, of course, there's that pesky day job.

For more info on the Art & WineFest, go to WOKV.com.  You can get online tickets at the discounted price of $35 until 6 pm.  After 6, they are $40 at the door.

Monday, July 4, 2011

Preparation and the Drawing

The first thing I do is to create a "toned ground."  This is a base color painted over the entire canvas.  This layer isn't seen directly in the finished painting at all, but it adds a depth of color that you can't get by painting on a white surface.  In this case, I'm using white gesso mixed with raw sienna and yellow oxide acrylic.
When I want precision (which I do with most of my paintings), I use the grid technique for creating the drawing.  As I was working on this one, I was already wondering if maybe I've lost my mind.  Tire tread?  Pedals?  These are not simple things.  Why am I painting them?  I am anticipating a struggle in that area, but for now I'll just move on.

Once I'm satisfied with the drawing, I place it over the canvas with a layer of white transfer paper in between.  I then trace over every line in the drawing to transfer it onto the canvas.  It's hard to see in the photo, but it looks something like this:
And now I put things away for a couple of days.  Not because I don't want to work on it more, but because that pesky day job gets in the way.